The BIOS setting of the motherboard is a very headache for most computer beginners. Blind changes can easily cause system or hardware running errors. In addition, the English letters on the screen are just like the Bible, so people can't start. Awesome. In fact, the BIOS setup is not difficult. As long as we understand the meaning of English, it is very simple to operate. Share a BIOS setup diagram tutorial here to help us better set up the motherboard bios.
What is the BIOS?BIOS is the abbreviation of "Basic Input Output System", which is translated as "basic input and output system".
So how do we get the computer into the BIOS setup interface? In fact, different brands of motherboards enter the BIOS setup program is not the same, the specific method should be based on the prompts in the lower left corner of the interface after the computer is turned on (in this case, it is necessary to explain: in general, most computers enter the BIOS The way to set the interface is to press the F2 or delete key of the keyboard).
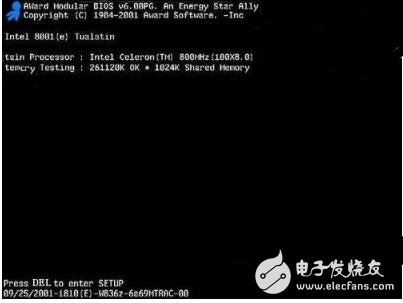
As shown in the bottom line of the above figure: "Press DEL to enter setup", this is to tell us to press the "delete" button to enter the BIOS after booting.

Standard CMOS Features: Use this option to set the system's IDE, time, date, floppy drive and device parameters.
Advanced BIOS Features: With this option we can set advanced features of the system;
Advanced Chipset Features: This option can set the chipset of the motherboard;
Integrated Peripherals: This allows all external devices to be set up. For example: USB keyboard, Modem, sound card and whether to open.
Power Management Setup: Used to set the power saving function of devices such as monitors, hard disks, and CPUs.
Plug and Play / PCI parameter setting (PnP / PCI ConfiguraTIons): Set the ISA PnP plug and play interface and PCI interface parameters, this function is only valid if the system supports PnP / PCI.
PC Health Status: This item is mainly used to display the voltage, fan speed and temperature data obtained by the system after automatic detection. You can also set your computer to be issued when the computer is overloaded. Alerts or automatic shutdown to prevent the machine from malfunctioning due to overuse.
Frequency/Voltage Control: This item can set the multiplier of the CPU and choose whether to automatically detect the frequency of the cpu runtime.
Load Fail-Safe Defaults: This item can be used to restore the factory default settings of the BIOS.
Load OpTImized Defaults: This item can be used to load the best performance of the BIOS, but has an impact on stability.
Set Supervisor Password: This item is used to set the password of the super user.
Set User Password: This item is used to set the user password.
Save & Exit Setup: Used to save the BIOS settings and exit.
Exit Without Saving: This item does not save your BIOS settings and exits.
Standard BIOS settings
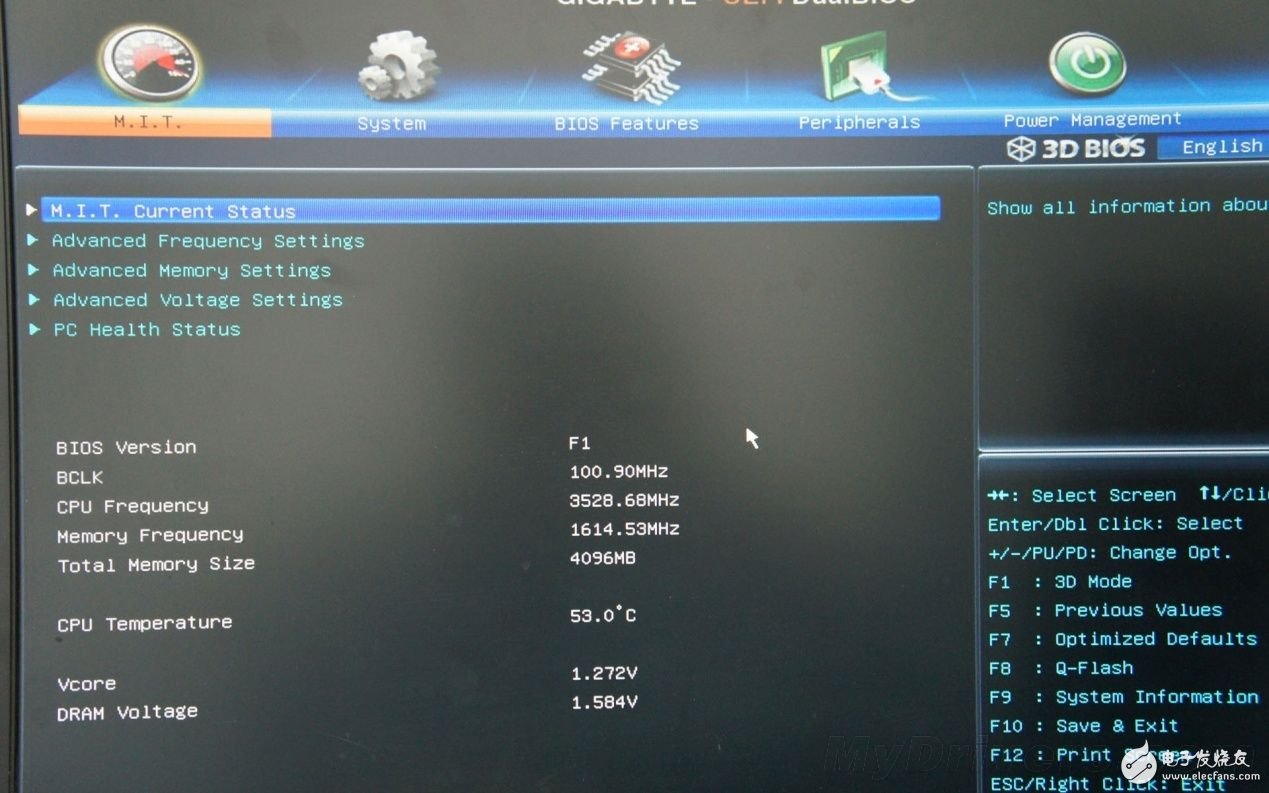
In the BIOS Setup main page, use the arrow keys to select the Standard CMOS Features option and press Enter to enter the BIOS standard settings page. Before the BIOS setup, it is necessary to know some of the control key functions as shown below.
Each function key is introduced:
"↑" moved up
"↓" moved down
"â†" left shift
"→" right shift
determine
Exit menu
"+/PU" Increase the value or change the option
"-/PD" Reduce values ​​or change options
Theme help, only valid in the status display menu and select settings menu
Restore the previous CMOS settings from CMOS, only valid in the Select Settings menu
Load CMOS values ​​from the Fail-Safe Defaults table, valid only in the Select Settings menu
Load optimization defaults
Save the modified value of the BIOS and exit
The computer time, date, optical drive, and floppy drive information can be set in the standard settings of the BIOS.1. Time and date settings
In the standard BIOS interface, use the arrow keys to move the cursor to Date and TIme, (Page Up/Page Down or +/- is the page-turning key) to modify the time and date of the system.
2. IDE interface settings
The IDE interface settings are mainly to set the number, work and type mode of the IDE device. There are usually two IDE interfaces in the computer motherboard, and only one data cable can connect two devices.
The meaning of the parameter settings of the IDE interface.
IDE Primary Master: The primary IDE interface of the first set of IDE slots.
IDE Primary Slave: The slave IDE interface of the first set of IDE slots.
IDE Secondary Master: The main IDE interface of the second IDE slot.
IDE Secondary Slave: The secondary IDE interface of the second IDE slot.
After selecting an IDE interface, select the hard disk type (Page Up/Page Down or +/-):
None (indicating that the device on the IDE interface is blocked when booting)
Manual Manual (indicating that the user is allowed to set the parameters of the IDE device)
Auto (indicating automatic detection of the parameters of the IDE device) (This option is recommended to help the system automatically find out the information of the hard disk)
3. floppy drive settings (Drive A/Drive B)
Drive A and Drive B can be used to select the type of floppy drive. Normally, the BIOS can support two floppy drives, so the system calls them A and B (namely Drive A and Drive B). If the floppy drive is connected to the twisted end of the data cable, it should be set to Drive A in the BIOS; if there is no twisted position in the middle of the data cable, it should be set to Drive B in the BIOS. There are four options in the floppy drive settings: None, 1.2MB, 1.44MB, and 2.88MB. The current floppy drive is almost all using a 1.44MB 3.5in floppy drive, so the corresponding setting is "1.44MB, 3.5in". If your computer does not have a floppy drive installed, set it to None.
4. Display mode setting (Video/ Halt On)
EGA/VGA is the default display mode of the system and does not need to be modified. The Halt On item is a system error setting that is used when an error occurs on the computer's power-on self-test.
5. Memory display
The memory display has three option settings: Base Memory, Extended Memory, and Total Memory. After completing the standard CMOS settings, press the Esc key to return to the BIOS setup main interface.
Select Advanced BIOS Features in the BIOS to enter the advanced BIOS settings. This interface allows you to set up information such as boot order, virus warnings, CPU cache, and quick power-on self-test.
1. Adjust the system startup sequence
There are four boot order settings: First Boot Device, Second Boot Device, Third Boot Device, and Boot Other Device. The values ​​that can be set for each item are: Floppy, IDE-0, IDE-1, IDE-2, IDE-3, CDROM, SCSI, LS120, ZIP, and Disabled. The system will read from the corresponding drive according to the boot sequence when the system starts. The operating system file is fetched, if the booting fails from the first device, the second boot device is read, if the second device fails to boot, the third boot device is read, and so on. If set to Disabled, this order is disabled. In addition, the Boot Other Device item indicates that it is booted using another device. Setting this to: Enabled allows the system to attempt to boot from another device after the above device fails to boot.
2. Virus warning
Virus Warning, Enabled This function protects the boot sector of the IDE hard disk. When this function is turned on, if a program attempts to write information in this area, the BIOS will display a warning message on the screen and beep. The settings are: Disabled and Enabled.
3. Set the CPU cache
Set the level 1 cache and level 2 cache inside the CPU. The settings are: Disabled and Enabled. Turning on the CPU cache helps improve CPU performance, so it is generally set to: Enabled.
12v power supply is suitable for LED, Electronic cigarette, Tablet, Water purifier, Router, CCTV camera, LCD, Motor, Fan, Toys Medical machine, POS machine, Beauty & Health equipment, Humidifier, LED lights etc.
We can meet your specific requirement of the products, like label design. The plug type is US/UK/AU/EU. The material of this product is PC+ABS. All condition of our product is 100% brand new. You can send more details of this product, so that we can offer best service to you!
12V Power Supply,12V Pc Power Supply,12V Dc Power Supply ,12V Power Supply For Pc
Shenzhen Waweis Technology Co., Ltd. , https://www.laptopsasdapter.com